-->


Performance
Evaluation of DSDV, AODV, and DSR
In this report, I
just show the simulation scripts to compare the performance of DSDV,
AODV, and DSR. More information about these adhoc routing protocols
can be found on the Internet or books.
(TCL script ---
adhoc.tcl)
if {$argc !=3} {
puts
"Usage: ns adhoc.tcl Routing_Protocol Traffic_Pattern
Scene_Pattern "
puts
"Example:ns adhoc.tcl DSDV cbr-50-10-8 scene-50-0-20"
exit
}
set par1 [lindex
$argv 0]
set par2 [lindex
$argv 1]
set par3 [lindex
$argv 2]
set val(chan)
Channel/WirelessChannel ;# channel type
set val(prop)
Propagation/TwoRayGround ;# radio-propagationmodel
set val(netif)
Phy/WirelessPhy ;# network interface type
set val(mac)
Mac/802_11 ;# MAC type
if {
$par1=="DSR"} {
set val(ifq)
CMUPriQueue
} else {
set val(ifq)
Queue/DropTail/PriQueue ;# interface queue type
}
set val(ll)
LL ;# link layer type
set val(ant)
Antenna/OmniAntenna ;# antenna model
set val(ifqlen)
50 ;# max packet in ifq
set val(rp)
$par1 ;# routing protocol
set val(x)
500
set val(y)
500
set val(seed)
0.0
set val(tr)
temp.tr
set val(nn)
50
set
val(cp) $par2
set val(sc)
$par3
set
val(stop) 100.0
set ns_
[new Simulator]
set tracefd
[open $val(tr) w]
$ns_ trace-all
$tracefd
$ns_ use-newtrace
set topo
[new Topography]
$topo
load_flatgrid $val(x) $val(y)
set god_
[create-god $val(nn)]
set chan_1_ [new
$val(chan)]
$ns_
node-config -adhocRouting $val(rp) \
-llType
$val(ll) \
-macType
$val(mac) \
-ifqType
$val(ifq) \
-ifqLen
$val(ifqlen) \
-antType
$val(ant) \
-propType
$val(prop) \
-phyType
$val(netif) \
-channel
$chan_1_ \
-topoInstance
$topo \
-agentTrace
ON \
-routerTrace
ON \
-macTrace
OFF
for {set
i 0} {$i < $val(nn) } {incr i} {
set
node_($i) [$ns_ node]
$node_($i)
random-motion 0 ;# disable random motion
}
puts "Loading
connection pattern..."
source $val(cp)
puts "Loading
scenario file..."
source $val(sc)
for {set i 0} {$i
< $val(nn) } {incr i} {
$ns_
initial_node_pos $node_($i) 20
}
for {set i 0} {$i
< $val(nn) } {incr i} {
$ns_ at
$val(stop).000000001 "$node_($i) reset";
}
$ns_ at
$val(stop).000000001 "puts \"NS EXITING...\"; $ns_
halt"
puts "Start
Simulation..."
$ns_
run
|
Performance metric:
Packet Delivery fraction (The ratio of the data packets delivered to
the destinations to those generated by the sources)
(AWK paring program
--- getRatio.awk)
BEGIN {
sendLine
= 0;
recvLine
= 0;
fowardLine = 0;
}
$0 ~/^s.* AGT/ {
sendLine
++ ;
}
$0 ~/^r.* AGT/ {
recvLine
++ ;
}
$0 ~/^f.* RTR/ {
fowardLine
++ ;
}
END {
printf
"cbr s:%d r:%d, r/s Ratio:%.4f, f:%d \n", sendLine,
recvLine, (recvLine/sendLine),fowardLine;
}
|
Before running
simulation, we have to use the tools to generate the traffic and
scenario patterns.
1.
Traffic
pattern (change the path to ~ns\indep-utils\cmu-scen-gen)

In this example,
traffic models were generated for 50 nodes with CBR traffic sources,
with maximum connections of 10 at a rate of 8kbps.
(-rate 2.0: in one
second, 2 packets are generated. The packet size is 512 byte.
Therefore the rate is 2*512*8=8kbps)
2. Scenario pattern
(change the path to ~ns\indep-utils\cmu-scen-gen)

In this example,
mobility models are created for the simulations using 50 nodes, with
pause time of 0 seconds, maximum speed of 20m/s, topology boundary of
500x500 and simulation time of 100 secs.
After creating the
traffic and scenario pattern files, copy them to the place where you
put the adhoc.tcl.
Start Running
Simulation
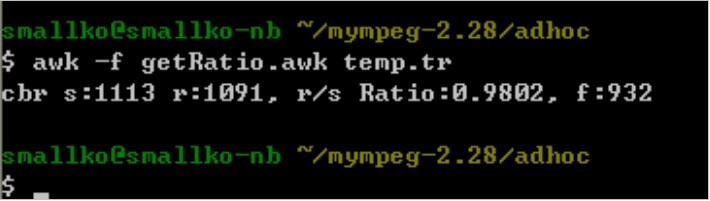
1. DSDV
Parse the result

1.
AODV


2.
DSR