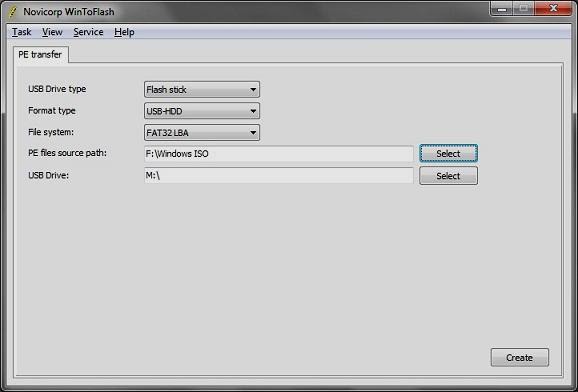
There are many procedures to create bootable USB disk, some of the procedures are given below :-
1st Method
I feel it is the easiest and the best way to create bootable USB disk …..
Now just follow these steps to create bootable USB disk:-
- Insert
your USB disk/pendrive to your system and backup all the data from the
USB as your USB drive will be formatted during the process.
- Now download WinToFlash tool (free) from here.
- Run the tool, and browse to your Windows 7, Vista, or XP DVD/CD files in Source path option, while in target option choose pendrive as your target drive (make sure that your USB drive letter is correct).
- Choose file system as FAT32.
- Click on Create button to begin the bootable USB process. Wait for few minutes so that the program copies your Operating System (OS) installation files to your USB disk.
- On completion Finish the process & now your bootable pendrive is ready for installation of OS.
Note :- Some times its shows error message" window root> hal.dll is missing, if it happens just ignore it & proceed with the next step.
2nd Method
You can use this method to make USB disk bootable without using any additional utility or program. For this you need a pen drive having minimum space of 4 GB (In case of vista / windows7) or 2GB (in case of windows XP) and a Installation DVD/CD of Windows 7/Vista/XP.
Now just follow these steps:-
1. First of all you need to format the USB drive / Pen drive:-
1. First of all you need to format the USB drive / Pen drive:-
Note :- Normal
right click format method of windows doesn’t work here as bootable
pendrive preparation needs some special treatment, also this bootable USB guide may not work if you are trying to make a bootable USB on a computer running on windows XP .
- From the start menu choose Run then open command prompt as an Administrator.
- Now to identify your USB Drive, you need to type this command and press enter every time.
- Diskpart and hit enter :- This is to open the disk partition program.
- list disk and hit enter :- This show the list of drives.
- Now you can see the disk listed. Note down the disk number of your pen drive. For example assume that the number is 'Disk 1 '.
- Now type all these commands in a successive manner and hit Enter every time to execute. The purpose of these commands here is to format the pen drive:
- select disk 1
- clean
- create partition primary
- select partition 1
- active
- format fs=NTFS or format fs=FAT32 (Format process may take few seconds)
- assign
- exit
Fig.1 Format using NTFS scheme
Fig.1 Format using FAT32 scheme
- Now the disk partition program will exit and your formatted USB flash drive ready to be made bootable.
2. Now to make the pen drive bootable, follow this steps:-
Now insert the Installation DVD/CD of Windows 7/Vista/XP in your DVD/CD drive and note down the drive letter of the DVD/CD drive and USB disk/pendrive. Here I use “G :” as my DVD/CD drive letter and “E:” as my USB drive letter.
Go back to command prompt and execute the following commands:
- Now assume that DVD drive is G: and Pen drive as E:
- Now type G: :CD BOOT and hit enter. Where “G:” is your DVD drive letter.
- CD BOOT and hit enter to see the below message.
- Now type BOOTSECT.EXE/NT60 E: to update your USB drive with bootmgr code. (Where “E:” is your USB drive letter)
- Finally copy all the contents from the Windows 7 DVD to your Pen drive.
- Now your pendrive is ready…
Here you have created the bootable pendrive. Now what you need is to make your BIOS to boot from USB. So follow this steps:-
- Insert your pen drive to the PC and restart the system.
- Now Enter the BIOS system accordingly by pressing the “delete” key. (This may vary sometimes it will be F2 or F12. It depends on your system make. Anyway during the start up, your system will display which key to press to enter the BIOS). Now select the USB/Pendrive as the first boot device in “Boot disk priority” option.
- Now save the settings in BIOS and restart your system, so that system is able to boot from USB and follow the steps necessary to Install Windows 7/Vista/XP.
Please make thanks
!!!!!!!!!!!!!!!!!!!!!!!!!!!!!!


No comments:
Post a Comment