AMAZON

Showing posts with label make. Show all posts

Sunday, September 23, 2012

how To Make Portable Version Of Any Software

a IT professional i know it is very hard to carry any software which is big in size, to solve this problem i always made Portable Version Software so it is easy to carry and handle in pen-drive There are a lot of software that you want to carry with you so that you can open them anywhere without any installations. Here is the solution to create a portable version of any software.Moreover you can also create a package of software..


Consider you love using Firefox browser and addicted to its user interface.You can create the portable version of Firefox with java and flash already installed in the Firefox. So you are not creating a portable version of your favorite browser instead you are creating a portable executable package file that has Firefox  with flash and java already installed in it.
 Your Firefox Package= Firefox Browser+Java+Flash+Addons
You can create a portable package of your choice of softwares.
Here is the complete step by step video tutorial  to  Make Portable Version Of any Software Using Cameyo
1. Download the Cameyo software.Its completely free.
2.Install the software.
3.Now Click on Start->Cameyo->Caputre Software Installation
4.Intstall the software into your system whose portable version you want to create.
5.After Complete installation of the software click on the Install Done of the cameyo screen.
6.Now it will create a portable version of your installed software which you can carry and run anywhere without any installation.
If u have any questions about Make Portable Version Of Any Software please post in comment section i will help you... 

How to make Bootable pendrive USB Disk for installing Windows 7, Vista, XP, windows 8


There are many procedures to create bootable USB disk, some of the procedures are given below :-
1st Method
I feel it is the easiest and the best way to create bootable USB disk …..
Now just follow these steps to create bootable USB disk:-
  •   Insert your USB disk/pendrive to your system and backup all the data from the USB as your USB drive will be formatted during the process.
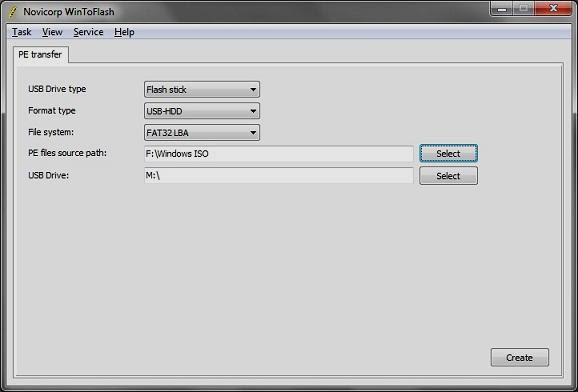
  •  Now download WinToFlash tool (free) from here.
  •   Run the tool, and browse to your Windows 7, Vista, or XP  DVD/CD files in Source path option,  while in target option choose pendrive as your target drive (make sure that your USB drive letter is correct).
  •  Choose file system as FAT32.
  •  Click on Create button to begin the bootable USB process. Wait for few minutes so that the program copies your Operating System (OS) installation files to your USB disk.
  •  On completion Finish the process & now your bootable pendrive is ready for installation of OS.
Note :- Some times its shows error message" window root> hal.dll is missing, if it happens   just ignore it & proceed with the next step.


2nd Method
 You can use this method to make USB disk bootable without using any additional utility or program. For this you need a pen drive having minimum space of 4 GB (In case of vista / windows7) or 2GB (in case of windows XP) and a Installation DVD/CD of Windows 7/Vista/XP.
Now just follow these steps:-

1. First of all you need to format the USB drive / Pen drive:-
Note :- Normal right click format method of windows  doesn’t work here as bootable pendrive preparation needs some special treatment, also this bootable USB guide may not work if you are trying to make a bootable USB on a computer running on windows XP .
  • From the start menu  choose Run then open command prompt as an Administrator.
  • Now to identify your USB Drive, you need to type this command and press enter every time.
  1.      Diskpart and hit enter :- This is to open the disk partition program.
  2.       list disk and hit enter  :- This show the list of drives.
  • Now you can see the disk listed. Note down the disk number of your pen drive. For example assume that the number is 'Disk 1 '.
  • Now type all these commands in a successive manner and hit Enter every time to execute. The purpose of these commands here is to format the pen drive:
  1.   select disk 1
  2. clean
  3.   create partition primary
  4. select partition 1
  5. active
  6.   format fs=NTFS   or   format fs=FAT32  (Format process may take few seconds)
  7.   assign
  8.   exit

                              Fig.1 Format using NTFS scheme
 
                            Fig.1 Format using FAT32 scheme
  • Now the disk partition program will exit and your formatted USB flash drive ready to be made bootable.

2. Now to make the pen drive bootable, follow this steps:-
Now insert the Installation DVD/CD of Windows 7/Vista/XP in your DVD/CD drive and note down the drive letter of the DVD/CD drive and USB disk/pendrive. Here I use “G :” as my DVD/CD drive letter and “E:” as my USB drive letter.
 Go back to command prompt and execute the following commands:
  • Now assume that DVD drive is G: and Pen  drive as E:
  • Now type G: :CD BOOT and hit enter. Where “G:” is your DVD drive letter.
  • CD BOOT and hit enter to see the below message.
  • Now type BOOTSECT.EXE/NT60 E: to update your USB drive with bootmgr code. (Where “E:” is your USB drive letter)
  • Finally copy all the contents from the Windows 7 DVD to your Pen drive.
  • Now your pendrive is ready…

Here you have created the bootable pendrive. Now what you need is to make your BIOS to boot from USB. So follow this steps:-
  • Insert your pen drive to the PC and restart the system.
  • Now Enter the BIOS system accordingly by pressing the “delete” key. (This may vary sometimes it will be F2 or F12. It depends on your system make. Anyway during the start up, your system will display which key to press to enter the BIOS). Now select the USB/Pendrive as the first boot device in “Boot disk priority” option.
  • Now save the settings in BIOS and restart your system, so that system is able to boot from USB and follow the steps necessary to Install Windows 7/Vista/XP.
If you like the above post then don’t forget to post your comments……
 
Please make thanks
!!!!!!!!!!!!!!!!!!!!!!!!!!!!!!

Monday, September 17, 2012

What are the html codes used for html website, blog, learn it basics


How to make Lines (horizontal rules)


Making a horizontal rule is probably the easiest thing to write in HTML. This is the command for a horizontal rule:
<hr>


How to make text in different Colours

Changing the color of text is also very simple. Here is the command:
<font face="" size=9 color="">
Here is where you write your text.

The size you can change if you want it bigger or smaller. In between the ""s you put the code of whichever colour you wish to use. Follow this Link to see a list of some color codes.


How to make text in different sizes

There are two ways to make text in different sizes. The first way is explained above in How to make text different Colours. That way is a little more complicated. The way I'll show you here can make the text in 7 different sizes. Here is the script:
<h1>

This size


<h2>

This size


<h3> is size

<h4>

This size


<h5>
This size

<h6>
This size
 

When you put text between the <h#> tags then you change the size. h1 is the biggest and h7 is the smallest.


How to make image backgrounds

This is a little more complicated but its still fairly simple. At the top of your HTML document there should be a section that looks like this:
<body bgcolor="" text="" link="" vlink=""> Inbetween all the ""s there will be color codes.
To make your background into a pattern or a picture you first need to have a pattern or picture uploaded into your directory or know the URL of a good background.
Change the command - <body bgcolor=""
To the command - <body background=" the URL of a background file "
For example, the command at the top of your page might look like this: 
<body background="http://www.what.com/what.gif" text="#000000" link="#000000" vlink="#000000">

This would make your background into what.gif (this is just an example it won't actually work). It would make the writing, the links, and the visited links all black.


How to make a Link to Another Page

Making links is VERY easy. Here is the command:
<a href=" the URL of the link ">
For example, to make a link on your page to here it would look like this:
<a href="http://www.geocities.com/sunsetstrip/alley/5615/> 

This will make a link but you won't be able to see it or use it, to make it work you have to put some text in between the command and the command. You have to include the tag at the end of every link or the rest of your page will be the link!


How to make a link to another page in the same directory

Making a link to a page in the same directory as your intitial page is VERY VERY easy. Here is the script to do it.
<a href=" address of page ">  

For Example, here is how I made a link from this page to the page that shows you colors:
<a href="color.htm">


How to make an Image on your Page

OK, this is also an extremely simple command. It's basically a link but a little different. Here is the script:
<img src=" URL of the image ">


How to make Images Into Links

Making images into Links is as easy as combining the two commands:
<a href=" URL of the link "> <img src=" whatever.gif "> </a>
You have to make sure that the actual Link reference comes before the image. Also the link closing tag has to come last.


How to control the size of your Images


To do this all you have to do is add this into your image command:
width=whatever height=whatever
For example, here it is all together:
<img src="whatever.gif" width=50 height=50> 


How to make text appear beside an image

Have you ever noticed that when you type beside an image the text only starts at the bottom of the pic and you end up with a big empty space? Well, this little addition to the image command will solve that problem:
align=right or align=left 
For example, here it is all together:
<img src="whatever.gif" height=50 width=50 align=right>

You don't need to have the height and width in there. This command will do this:
Hey.. this text is at the top and not the bottom. How convenient eh?


How to make "freestyle" text

Making "freestyle"(in other words, text "as is") text is as easy as making it bold or italic. Here is the script:
<pre>
Here you put your writing.
</pre>
This way you can do whatever you want, write song lyrics without them turning into a paragraph, write words in list form, etc.


How to make a link that opens a new browser Window

This is as easy as adding a command at the end of the link command. Here is the command:
target=body
For example, here it is all together:
<a href=" URL of place " target=body>

This will open a new window when you make a link, especially useful when making links in chats.