AMAZON

Showing posts with label To. Show all posts

Sunday, September 23, 2012

don\'t want to give up your real e-mail address to sign up for a site?

Why would you use this? Maybe you want to sign up for a site which requires that you provide an e-mail address to send a validation e-mail to. And maybe you don\'t want to give up your real e-mail address ...

Why would you use this? Maybe you want to sign up for a site which requires that you provide an e-mail address to send a validation e-mail to. And maybe you don\'t want to give up your real e-mail address and end up on a bunch of spam lists. This is nice and disposable. And it\'s free. Enjoy!
10 minute mail PHP Script
download 10 minute mail PHP Script .zip
Download:
10-minute-mail-php-script.rar [1.39 Mb] (Count: 961)


introduce about all Google services which are providing by Google to its user/clientall-google-services


Google has given a lot of things in technology wise that today we couldn’t spent or even imagine one day without Google on internet. 


Apart from its web search, Google offers a variety of services and tools which helps people to communicate with their friends through email, chat or social networks and has given platform to discover and share articles with friends and so many things. 

Now here, i have listed some of the Google services which you would like to know.


This is a partial list of Google’s services:

3
A
B
C
D
F
G
H
J
L
M
N
O
P
Q
R
S
Satellite map images with missing or unclear data
Google Scholar
Google Scholar and academic libraries
Sitemaps
Sitemap index
Google Sites
SketchUp
Google Squared
Google Street View
Supplemental Result
T
V
W
X
Google X
Y

how To Make Portable Version Of Any Software

a IT professional i know it is very hard to carry any software which is big in size, to solve this problem i always made Portable Version Software so it is easy to carry and handle in pen-drive There are a lot of software that you want to carry with you so that you can open them anywhere without any installations. Here is the solution to create a portable version of any software.Moreover you can also create a package of software..


Consider you love using Firefox browser and addicted to its user interface.You can create the portable version of Firefox with java and flash already installed in the Firefox. So you are not creating a portable version of your favorite browser instead you are creating a portable executable package file that has Firefox  with flash and java already installed in it.
 Your Firefox Package= Firefox Browser+Java+Flash+Addons
You can create a portable package of your choice of softwares.
Here is the complete step by step video tutorial  to  Make Portable Version Of any Software Using Cameyo
1. Download the Cameyo software.Its completely free.
2.Install the software.
3.Now Click on Start->Cameyo->Caputre Software Installation
4.Intstall the software into your system whose portable version you want to create.
5.After Complete installation of the software click on the Install Done of the cameyo screen.
6.Now it will create a portable version of your installed software which you can carry and run anywhere without any installation.
If u have any questions about Make Portable Version Of Any Software please post in comment section i will help you... 

How to make Bootable pendrive USB Disk for installing Windows 7, Vista, XP, windows 8


There are many procedures to create bootable USB disk, some of the procedures are given below :-
1st Method
I feel it is the easiest and the best way to create bootable USB disk …..
Now just follow these steps to create bootable USB disk:-
  •   Insert your USB disk/pendrive to your system and backup all the data from the USB as your USB drive will be formatted during the process.
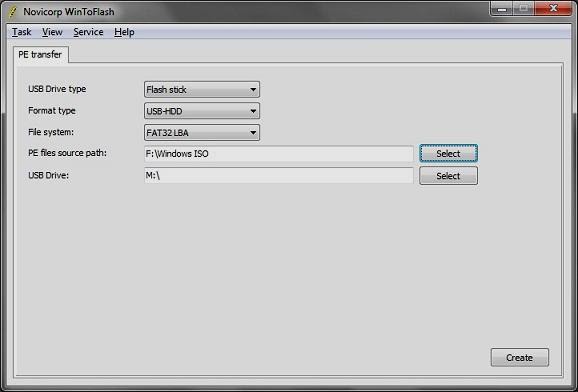
  •  Now download WinToFlash tool (free) from here.
  •   Run the tool, and browse to your Windows 7, Vista, or XP  DVD/CD files in Source path option,  while in target option choose pendrive as your target drive (make sure that your USB drive letter is correct).
  •  Choose file system as FAT32.
  •  Click on Create button to begin the bootable USB process. Wait for few minutes so that the program copies your Operating System (OS) installation files to your USB disk.
  •  On completion Finish the process & now your bootable pendrive is ready for installation of OS.
Note :- Some times its shows error message" window root> hal.dll is missing, if it happens   just ignore it & proceed with the next step.


2nd Method
 You can use this method to make USB disk bootable without using any additional utility or program. For this you need a pen drive having minimum space of 4 GB (In case of vista / windows7) or 2GB (in case of windows XP) and a Installation DVD/CD of Windows 7/Vista/XP.
Now just follow these steps:-

1. First of all you need to format the USB drive / Pen drive:-
Note :- Normal right click format method of windows  doesn’t work here as bootable pendrive preparation needs some special treatment, also this bootable USB guide may not work if you are trying to make a bootable USB on a computer running on windows XP .
  • From the start menu  choose Run then open command prompt as an Administrator.
  • Now to identify your USB Drive, you need to type this command and press enter every time.
  1.      Diskpart and hit enter :- This is to open the disk partition program.
  2.       list disk and hit enter  :- This show the list of drives.
  • Now you can see the disk listed. Note down the disk number of your pen drive. For example assume that the number is 'Disk 1 '.
  • Now type all these commands in a successive manner and hit Enter every time to execute. The purpose of these commands here is to format the pen drive:
  1.   select disk 1
  2. clean
  3.   create partition primary
  4. select partition 1
  5. active
  6.   format fs=NTFS   or   format fs=FAT32  (Format process may take few seconds)
  7.   assign
  8.   exit

                              Fig.1 Format using NTFS scheme
 
                            Fig.1 Format using FAT32 scheme
  • Now the disk partition program will exit and your formatted USB flash drive ready to be made bootable.

2. Now to make the pen drive bootable, follow this steps:-
Now insert the Installation DVD/CD of Windows 7/Vista/XP in your DVD/CD drive and note down the drive letter of the DVD/CD drive and USB disk/pendrive. Here I use “G :” as my DVD/CD drive letter and “E:” as my USB drive letter.
 Go back to command prompt and execute the following commands:
  • Now assume that DVD drive is G: and Pen  drive as E:
  • Now type G: :CD BOOT and hit enter. Where “G:” is your DVD drive letter.
  • CD BOOT and hit enter to see the below message.
  • Now type BOOTSECT.EXE/NT60 E: to update your USB drive with bootmgr code. (Where “E:” is your USB drive letter)
  • Finally copy all the contents from the Windows 7 DVD to your Pen drive.
  • Now your pendrive is ready…

Here you have created the bootable pendrive. Now what you need is to make your BIOS to boot from USB. So follow this steps:-
  • Insert your pen drive to the PC and restart the system.
  • Now Enter the BIOS system accordingly by pressing the “delete” key. (This may vary sometimes it will be F2 or F12. It depends on your system make. Anyway during the start up, your system will display which key to press to enter the BIOS). Now select the USB/Pendrive as the first boot device in “Boot disk priority” option.
  • Now save the settings in BIOS and restart your system, so that system is able to boot from USB and follow the steps necessary to Install Windows 7/Vista/XP.
If you like the above post then don’t forget to post your comments……
 
Please make thanks
!!!!!!!!!!!!!!!!!!!!!!!!!!!!!!

How to set up a wireless network (PC to PC) without a router

Select Start menu --> control Panel and then the control menus pop up appears


Wireless networks are helpful because they let you use your computer and connect to the Internet anywhere in your home or office. However, most wireless networks use a wireless router, which can be expensive. If you have more than one computer, you can set up a wireless network without buying a wireless router and save yourself some money.


In a traditional wireless network, a wireless router acts as a base station, much like the base station for cordless phones. All wireless communications go through the wireless router, allowing nearby computers to connect to the Internet or to each other.

Ad hoc wireless networks work more like walkie-talkies, because the computers communicate directly with each other. By enabling Internet Connection Sharing on one of the computers, you can share Internet access.


Ad hoc networking might seem like a much smarter alternative to using a wireless router, but it does have a couple of disadvantages:
If the computer connected to the Internet is shut down, all computers that are part of the ad hoc network lose their Internet access.
To connect to the Internet, one computer always needs a wired network connection.

To connect your computers to the Internet using an ad hoc wireless network, follow these high-level steps (described in more detail later in this article):

1.
Enable Internet Connection Sharing on the Internet-connected computer. You can skip this step if you don't need to access the Web.
2.
3.

How to enable Internet Connection Sharing
On networks with wireless routers, the router has the important job of forwarding communications from the computers on your home network to the Internet. On ad hoc networks, you must designate one computer to serve this role. The computer you choose must have a wired connection to the Internet, and it should be left on whenever you want to be able to use your other computers.

Procedure to set up the first(Main) computer
To set up an ad hoc wireless network that allows computers to share an Internet connection without a router  the procedure is :-
1.
2.
Click Start, and then click Control Panel.
3.
Under Pick a category, click Network and Internet Connections.

4.
Under or pick a Control Panel icon, click Network Connections.

5.
Right-click your wireless network connection, and then click Properties.

6.
In the Wireless Network Connection Properties dialog box, click the Wireless Networks tab.

7.
On the Wireless Networks tab, under Preferred networks, click Add.

8.
In the Wireless network properties dialog box, on the Association tab, type the name of your ad hoc wireless network in Network name (SSID) box (shown in step 10). For example, you could name your wireless network MyHomeNetwork.
9.
Clear the The key is provided for me automatically check box and select the This is a computer-to-computer (ad hoc) network check box.
10.
Create a 13-digit password and type it in both the Network key and Confirm network key boxes. For the best security, include letters, numbers, and punctuation. Then click OK.

11.
Click OK again to save your changes.


How to set up additional computers
If the computer you want to add to your network does not have built-in wireless network support, install a wireless network adapter.
Windows XP automatically detects the new adapter and notifies you that it found a wireless network.

Now connect your computer to your wireless network
Note: These steps apply only if you're using Windows XP Service Pack 2 (SP2). If you haven't installed SP2, visit Microsoft Update to install it before connecting to the ad hoc network.

1.
Right-click the Wireless Network icon in the lower right corner of your screen, and then click View Available Wireless Networks.

2.
The Wireless Network Connection window appears and displays your wireless network listed with the SSID you chose. If you don't see your network, click Refresh Network List in the upper left corner. Click your network, and then click Connect in the lower right corner.

3.
Windows XP prompts you to enter a key. Type your encryption key in both the Network key and Confirm network key boxes, and then click Connect.


Windows XP shows its progress as it connects to your network. After you're connected, you can close the Wireless Network Connection window.
Repeat these three steps on each computer that you want to connect to your ad hoc wireless network.
Now you're ready to browse the Web wirelessly, from any computer you add to your home network.