AMAZON

Showing posts with label HOW. Show all posts

Friday, September 28, 2012

How Many Words count should be there or maximum tolerable on a Resume or CV


Have you run a word count on your resume? Typically there are from 400 to 700 resume words per page depending on a few factors. Students, new graduates, and entry-level candidates with less work history often have lower total word counts. What if you have too few words or you are way over the upper end of 700?
How many words should be on a resume?
You need to be sure you have included all the skills and expertise you have that the employer is seeking. Because of font sizes, white space, layout and formatting, the count is not a critical factor. What is critical is: WHAT terms you use and if the format is reader friendly. Rather than counting your resume words you need to make sure every word counts!
Can my resume be too wordy?
Yes. Wordy is defined as: the excessive use of words. Wordy is not always a measure of the total quantity used but rather the ones chosen. Here is an example:
Managed the total and entire retail store including each and every of the 29 full and part-time new and experienced employees that were in retail sales on the floor for the store.
That is an actual statement from a resume prepared by a certified resume writer! The word count is 33. The following statement says the same thing with 27 less words!
Managed retail store with 29 employees.
Get the idea? Wordy is the use of irrelevant or unneeded terms. Statements should be concise.
Now the statement is succinct. What can be added to this example is an accomplishment. That will have far more impact than creating wordy proclamations.
Managed retail store with 29 employees and created incentive program which reduced hiring turnover by 24%.
See how much more that statement says than the original sentence? And that is still 17 words less than the first example sentence. Word quantities alone mean nothing. So your resume could be lacking in quality descriptions of your experience and accomplishments and therefore not have enough words, or include irrelevant or unneeded terms and then have too many.
What are power resume words?
These expressions impact the reader (employer) and instill a specific confidence or belief. Some are adjectives and can be used to support statements about specific skills. They often need to be accompanied by measurable results to have maximum impact. This is achieved by creating accomplishment statements.
What are resume keywords?
These terms frequently describe your knowledge, skills, and abilities though they can also have other definitions such as geographic locations, job titles, or certain employer names. They are the terms employers enter for digital scanning and use in job postings to describe the knowledge, skills, abilities, and attributes they are seeking in candidates. You need to match your skills with as many relevant keywords as you can. The three main sources for these are:
  1. the employer job description or posting
  2. the corporate culture of the employer (Usually found in communications within the company and on their publications, messages, website, social networking sites, and press releases.)
  3. industry jargon from publications, news, and the web.
What are skill words?
These expressions describe skills and sometimes abilities, talents, expertise, and other qualifications. They become resume keywords when the target employer has used them to describe what they want to see in candidates. These expressions are critical for passing document scanning and for being recognized and tagged as a viable candidate.
Can I use pronouns?
Pronouns are generally not resume words. This type of writing presents a challenge as the statements are not grammatically correct in accordance with most English education. One method of making this type of writing easier is to create your statements with pronouns and then remove them when you are done.

Is it a good idea to use big or complicated terms the employer might not know?
No. You will not impress employers by using uncommon or generally unknown language or acronyms. Look for an ordinary synonym as a replacement or eliminate a complex or difficult expression.
Are there words I should NOT USE on my resume?
Yes.

Wednesday, September 26, 2012

How to make a Call Conference:This feature allows you to speak with five to six people


This feature allows you to speak with five to six people at the same time from wherever you are. It is just perfect for times when teamwork matters so much to job success. 

You can have a conference with either cellular or landline phones including STD and ISD calls. All calls will have to be initiated by you.

 All your calls will be charged the Airtime and DoT charges as applicable to ensure of this service, you need a call conference compatible handset.   


How to do  


To initiate a Conference Call while you are in conversation with one: '

  • Put the existing line on hold   
  •  
  • Press Options/Menu  
  •  
  • Choose 'New Call'  
  •  
  • Dial the number of the third person  
  •  
  • Then choose conference option  
  •  
  • when the 2nd caller comes on line 
  •  
  • Answer the second call  
  •  
  • Press Options/Menu  
  •  
  • Choose 'Conference'  
  •  
  • Now the 3 of you are in conference  
  •  
  • Repeat the same procedure to bring 4th, 5th and 6th person into conferencing   
  •  

Sunday, September 23, 2012

Memory Cards Compatibility with your handset


Cellphones are increasingly taking up the functions of a computer for checking e-mails and office documents, browsing internet and playing games. Also they are being used for listening to music, watching video clips, taking pictures etc. So one thing that is becoming very important is the size of its memory. Internal memory available on a mobile phone varies from 5MB to 128MB. But this is not sufficient for handling multimedia files like music, pictures and video. That is why seperate Memory Cards are needed. Most of the advanced cellphones these days come with a Memory Slot where you can insert the extra Memory Card. This memory slot is sometimes hidden under the battery, so you have to switch off the cellphone, remove the battery and then insert the memory card. Some manufacturers have eased out this problem by providing the memory slot on the side of the handset with a small cover. So inserting and removing memory cards has become as easy as you change floppy in a computer.
 
Things to be kept in mind while purchasing an extra memory card: 1. Compatibility with your handset. The popular memory cards used in cellphones are SD (Secure Digital), MMC (Multi Media Card) and Memory Stick Pro. Nokia uses MMC or RS DV MMC  (Reduced Size Dual Voltage MultiMediaCard) while SonyEricsson uses its proprietary memory stick. Most of the other brands like Motorola, Panasonic, Sagem, O2, I-mate etc use SD cards.
2. The storage capacity. It depends upon what capacity your handset can handle. Some phones do not support higher capacity cards. Memory cards come in capacities like 128MB, 256MB or 512MB etc. More capacity means higher price.
3. Always buy these cards from direct company showrooms or authorised dealers only as there are lots of spurious memory cards in the market which can be cheaper but you may get cheated as the failure rate of these cards is very high and there is no guarantee of its actual capacity.
You can use many memory cards if your requirement for capacity is more.

Mobile Banking, How many times you visit your bank or wait endlessly for a phone call to get through customer care just to check your bank balance?


How many times you visit your bank or wait endlessly for a phone call to get through customer care just to check your bank balance? You need not waste your precious time for these small jobs anymore. Now you can access your bank account and conduct a host of banking transactions and inquiries through Mobile Banking service. Mobile Banking is a service that allows you to do banking transactions through your mobile phone without making a call, using the SMS / WAP facility. You can check your balance, stop a cheque payment, or even pay your utility bills. Mobile Banking service gives you account information and real-time transaction capabilities from the mobile phones anywhere, anytime. Some of the Services that are available through Mobile Banking are:
  • You can get your Balance details
  • Get last 3 Transaction details
  • Request for a Cheque Book
  • Stop a Cheque payment
  • Inquire about a cheque status
  • Request an account statement
  • Get Fixed Deposit details
  • Get Bill payment details for Electricity, Mobile phone and Telephone services
  • Pay your bills
What you have to do is:
  • Designate a particular account linked to your Cust-id as the Operative Account.
  • Balance inquiry will give you information on all accounts linked to your Customer Identification Number.
  • All other transactions will give you information on your Operative Account.
Mobile Banking through SMS
Mobile Banking with SMS is conducted through SMS codes sent to a particular number as directed by your bank. You will receive the response in the form of a text message on your mobile phone screen within a few seconds. For example to get details of your HDFC bank account you will use codes like HDFCBAL, HDFCTXN, HDFCSTM, HDFCSTP<6 digit cheque no.>, etc. for balance enquiry, last transaction details, account statement, stop cheque payment etc. respectively.
How it works?
The message sent by you travels from your mobile phone to the SMS Centre of the Cellular Service Provider, and from there it travels to the Bank's systems. The information is retrieved and sent back to your mobile phone via the SMS Centre, all in a matter of a few seconds.

Mobile Banking through WAP
Once you log onto your Bank's WAP site through your WAP/GPRS enabled mobile phone, all you need to do is enter your Cust ID and Net Banking IPIN.  Then go to the Transactions Menu after selecting your account. Select any one of the Transactions like Balance Inquiry, Mini Statement, Statement Request( A Statement of Accounts for the selected account for the current period will be mailed to your address on record with the bank), Cheque Book Request (It will be mailed to your address on record with the bank), Stop Payment, Cheque Status Inquiry(will tell you if the cheque has been paid/unpaid/stopped/invalid), Fixed Deposit Inquiry( can get information on account number, principal amount, rate of interest, maturity date and maturity amount) etc.

Who can avail Mobile Banking services ?
To avail Mobile Banking services you must have:

  • an account in a Bank that offers Mobile Banking service e.g. HDFC Bank
  • you must be a subscriber of any of the Cellular Service Providers which have tie up with your Bank
  • You have to Apply for Mobile Banking through an appropriate Application Form with your bank
  • Most of the Banks offer Mobile Banking service absolutely FREE. Although SMS Charges for outgoing messages would be charged as usual by your mobile phone Service Provider.
Mobile Banking Alerts
Some banks also provide the facility of Mobile Banking Alerts where you can get regular updates of transactions in your account as they happen. These include:
  • Credits to your account ( you choose a threshold credit amount, above which you'd like to be alerted )
  • Debits to your account  ( you choose a threshold debit amount, above which you'd like to be alerted  )
  • Cheque returned ( Get to know every time a cheque deposited in your account is returned )
In the time to come we will see more and more banks offering such services in India which will definitely make our life easier.
 

how can i know all mobile network DATA BALANCE, sms pack through these types of codes, Mobile Operator Codes /USSD Codes for Mobile Operators

Mobile Operator Codes /USSD Codes for Mobile Operators


Sometimes it happens that we forget our mobile number or want to know about our data (GPRS) balance usage, validity of sim, account balance or to stop or start a service provided by mobile telecom operator but we are unaware of the USSD codes or mobile operator code for that, also as market is flooded by so many telecom operators so it is very difficult to remember all these mobile codes.
That’s why I decided to put all major mobile operator codes/USSD (Unstructured Supplementary Services Data) here so that everybody can use them. There is a possibility that some of the codes not work in some regions , so therefore I request to all of my readers to paste latest mobile operator codes in comment section.


check the number up west

*131*1# for idea
*111*2# for vodafone
*121*9# for airtel
*1# for relience
___________________________________________________________________________

Airtel
*140*6575# by dialing this you will recieve a call from your number itself use it to know your number.(not sure abt it whether it works everywhere)
Do Not Disturb ‐ Regisitration or deregistration SMS “DND” to 121or 1909
For MOBILE INTERNET Internet settings sms MO to 543210
To stop any service Activated on your mobile type " STOP " and send to 121
Delhi
*222*2# - Airtel to Airtel 30 paise call 24hr. 5Rs
*678# - AIRTEL ACT & DEACT Hello Tune ALL CIRCLE working roaming Area
*123*11# - Show your ALL Balance
*567*2# - Net On Phone, NOP
*321# - Airtel live Packs
West Bengal
121 - Customer care
*123# - Balance and validity details
*121# - Airtel services
*123*10# - GPRS data balance check, for Mumbai & Orissa circles the no. is *123*6# & for Maharastra circle its *123*7#
Chhattisgarh
GPRS related:
*567*1# - Rs.10 unlimited GPRS for 1 day
*567*19# - To deactivate mobile office
*567*6# 1 - Month unlimited sms pack
*567*11# - default 30p/50kb plan
Maharashtra
*123*8# - airtel to airtel night balnc
*123*5# -local & national sms
*121# - for value added services
*123*6# - GPRS data balance check in mumbai rest Maharastra circle its *123*7#


try these codes *126*1# or *126*4# or 111*10# or *111*9#
this USSD dear *140*6575# instead of showing your mobile number directly,you will recieve a call from your number itself..
__________________________________________________________

BSNL

Bsnl all India
Dial 164 and call or *8888# - to know your Mobile Number.
*123# - Balance and validity details
*123*10# -GPRS data balance check
*123*1# - SMS local
*123*2# - National sms
*123*5# - Network call
*123*6# - local network call (data bal check for UP)
*123*8# - Night GPRS pack
*123*9# - video call bal
9400024365 - Customer care Eastern region
_________________________________________________________________________________
VODAFONE (HUTCH)

*141# - Check main balance
*555# - To activate GPRS /SMS plan(Not sure about this pl'z verify )
*142# - To know free sms balance
*145# - To know calling balance
Vodafone gprs data balance send GPRS to 144.
*555# and then press call to know your mobile number?
------------------------------------------------------------------------------------------------------------
RELIANCE GSM

Reliance All India
*1# and then press call to know your mobile number?
Balance & validity – *367# or *306# or*402# and call or call 58402
Recharge – *368# or *305*<14 digit pin># and call or call 58401
Special Packs – *777#
Caller Tunes – *999#
Packs – *123# , *321#
Free Net – *123*099#
Customer care reliance smart- *333 or *369
GPRS settings – send “ALL” to 55100
Admin menu/common access no.- *369
GPRS DATA balance Check type " MBAL" and send to 55333 or dial *367*3#(working in kolkata)
Local Call balance - *367*2#


For karnataka idea
to know balance *456#
to know promo balance*457#
to know your number*100#
_________________________________________________________________________________

TATA DOCOMO/T24
*1# and then press call to know your mobile number?
For Roaming tariffs call 121

West Bengal
Balance : - *111# or call 12525
Customer care – 121 or 9038012345
DND – call 1909 or sms “START DND” to 1909
Recharge - *135*2<Recharge pin># and call or dial 12525
GPRS settings – send “INTERNET” to 52270
GPRS data -*191# ( choose from reply menu)
Haryana
Balance : - *111#
Activating daily/weekly/new services/Internet Packs : - *141#
Detail Of Any Service Activated, Internet Free usage left : - *191*3#
More Info :- *191#
___________________________________________________________________________
AIRCEL               
*1# and then press call to know your mobile number?
121 or dial 123 or 9804012345(For Eastern Region of country) - Customer care
*125# or *127#  or send BAL to 121 or use IVRS available at 123 -For  Balance and validity details
*126*1# -  Voice Dedicated Account Balance and Validity
*126*2#- To know your SMS Dedicated Account Balance and Validity
*126*1#  -GPRS data bal or *126*4#
E-Recharge-*124*<16-digitPIN number># or call 124
For Missed Call Alert SMS -“MCA D” and send it to 5799
For Pocket Internet/GPRS settings send PI to 121
Do Not Disturb list, sms “Start DND” to 1909. You may also call 121
1213 Latest Scheme Menu
1214 Value Added Services Menu.
1215 Rate Cutter Menu
*123# Minutes and SMS count
_________________________________________________________________________________
MTS                           
To activate* the Internet service in your mobile dial *109*210# and pressing call button.
or call 111 or call at these numbers

Bihar: 9135-955-955
Delhi: 9136-955-955
Haryana: 9138-955-955
Karnataka: 9141-955-955
Kerala: 9142-955-955
Kolkata: 9153-955-955
Maharashtra: 9145-126-126
Mumbai: 9146-126-126
Pune: 9146-126-126
Rajasthan: 9667-955-955
Tamil Nadu: 9150-955-95
___________________________________________________________________________________
Uninor 
*222*2# - to check your prepaid comment balance
______________________________________________________________________________
IDEA  
*1# and then press call to know your mobile number?
Dial *130# to check your Idea prepaid account balance
APN-  imis  or  internet


GPRS DATA- If you're on postpaid, Idea will send you one message each day giving you information about your data usage.
If you  are using prepaid, they send you a messafe at the end of each session


customer care-12345
______________________________________________________
BPL  
Mumbai
Balance Info *100#
Local Loop To Loop Calls *101#
SMS Pack Balance *102#
Free Local Call *103#
Free Std Balance *104#
E-recharge *105#
Free Loop To Other Mobile *106#
Free Local+ National SMS *107#
STD +Landline *108#
______________________________________________________________________________________________________________
Videocon

Dial *123# to check your Videocon prepaid account balance

vodafone

Hi, to check vodafone prepaid
*141*9# to check gprs bal.
*141*1# to check sms
*444*3# for activating internet plan
VL TO144 for configuration
WWW to 52586 for advanced gprs config.
we should have link for exchange please contact me at nsmsolutions@hotmail.com
Hi, to check vodafone prepaid
*141*9# to check gprs bal.
*141*1# to check sms
*444*3# for activating internet plan
VL TO144 for configuration
WWW to 52586 for advanced gprs config.
*111*6# - 2 - Vodafone Gprs Usage balance

Dear all, many carriers use *1# USSD code for self Number checking.......check it

How to make Bootable pendrive USB Disk for installing Windows 7, Vista, XP, windows 8


There are many procedures to create bootable USB disk, some of the procedures are given below :-
1st Method
I feel it is the easiest and the best way to create bootable USB disk …..
Now just follow these steps to create bootable USB disk:-
  •   Insert your USB disk/pendrive to your system and backup all the data from the USB as your USB drive will be formatted during the process.
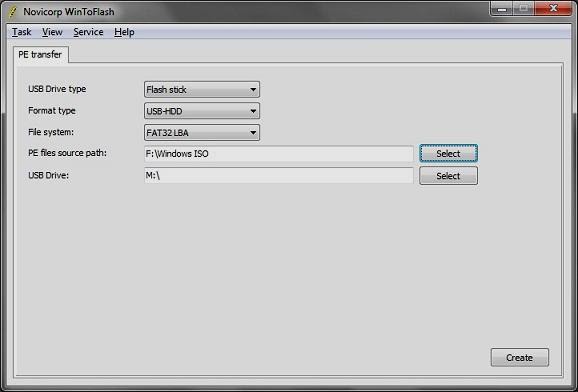
  •  Now download WinToFlash tool (free) from here.
  •   Run the tool, and browse to your Windows 7, Vista, or XP  DVD/CD files in Source path option,  while in target option choose pendrive as your target drive (make sure that your USB drive letter is correct).
  •  Choose file system as FAT32.
  •  Click on Create button to begin the bootable USB process. Wait for few minutes so that the program copies your Operating System (OS) installation files to your USB disk.
  •  On completion Finish the process & now your bootable pendrive is ready for installation of OS.
Note :- Some times its shows error message" window root> hal.dll is missing, if it happens   just ignore it & proceed with the next step.


2nd Method
 You can use this method to make USB disk bootable without using any additional utility or program. For this you need a pen drive having minimum space of 4 GB (In case of vista / windows7) or 2GB (in case of windows XP) and a Installation DVD/CD of Windows 7/Vista/XP.
Now just follow these steps:-

1. First of all you need to format the USB drive / Pen drive:-
Note :- Normal right click format method of windows  doesn’t work here as bootable pendrive preparation needs some special treatment, also this bootable USB guide may not work if you are trying to make a bootable USB on a computer running on windows XP .
  • From the start menu  choose Run then open command prompt as an Administrator.
  • Now to identify your USB Drive, you need to type this command and press enter every time.
  1.      Diskpart and hit enter :- This is to open the disk partition program.
  2.       list disk and hit enter  :- This show the list of drives.
  • Now you can see the disk listed. Note down the disk number of your pen drive. For example assume that the number is 'Disk 1 '.
  • Now type all these commands in a successive manner and hit Enter every time to execute. The purpose of these commands here is to format the pen drive:
  1.   select disk 1
  2. clean
  3.   create partition primary
  4. select partition 1
  5. active
  6.   format fs=NTFS   or   format fs=FAT32  (Format process may take few seconds)
  7.   assign
  8.   exit

                              Fig.1 Format using NTFS scheme
 
                            Fig.1 Format using FAT32 scheme
  • Now the disk partition program will exit and your formatted USB flash drive ready to be made bootable.

2. Now to make the pen drive bootable, follow this steps:-
Now insert the Installation DVD/CD of Windows 7/Vista/XP in your DVD/CD drive and note down the drive letter of the DVD/CD drive and USB disk/pendrive. Here I use “G :” as my DVD/CD drive letter and “E:” as my USB drive letter.
 Go back to command prompt and execute the following commands:
  • Now assume that DVD drive is G: and Pen  drive as E:
  • Now type G: :CD BOOT and hit enter. Where “G:” is your DVD drive letter.
  • CD BOOT and hit enter to see the below message.
  • Now type BOOTSECT.EXE/NT60 E: to update your USB drive with bootmgr code. (Where “E:” is your USB drive letter)
  • Finally copy all the contents from the Windows 7 DVD to your Pen drive.
  • Now your pendrive is ready…

Here you have created the bootable pendrive. Now what you need is to make your BIOS to boot from USB. So follow this steps:-
  • Insert your pen drive to the PC and restart the system.
  • Now Enter the BIOS system accordingly by pressing the “delete” key. (This may vary sometimes it will be F2 or F12. It depends on your system make. Anyway during the start up, your system will display which key to press to enter the BIOS). Now select the USB/Pendrive as the first boot device in “Boot disk priority” option.
  • Now save the settings in BIOS and restart your system, so that system is able to boot from USB and follow the steps necessary to Install Windows 7/Vista/XP.
If you like the above post then don’t forget to post your comments……
 
Please make thanks
!!!!!!!!!!!!!!!!!!!!!!!!!!!!!!

How to set up a wireless network (PC to PC) without a router

Select Start menu --> control Panel and then the control menus pop up appears


Wireless networks are helpful because they let you use your computer and connect to the Internet anywhere in your home or office. However, most wireless networks use a wireless router, which can be expensive. If you have more than one computer, you can set up a wireless network without buying a wireless router and save yourself some money.


In a traditional wireless network, a wireless router acts as a base station, much like the base station for cordless phones. All wireless communications go through the wireless router, allowing nearby computers to connect to the Internet or to each other.

Ad hoc wireless networks work more like walkie-talkies, because the computers communicate directly with each other. By enabling Internet Connection Sharing on one of the computers, you can share Internet access.


Ad hoc networking might seem like a much smarter alternative to using a wireless router, but it does have a couple of disadvantages:
If the computer connected to the Internet is shut down, all computers that are part of the ad hoc network lose their Internet access.
To connect to the Internet, one computer always needs a wired network connection.

To connect your computers to the Internet using an ad hoc wireless network, follow these high-level steps (described in more detail later in this article):

1.
Enable Internet Connection Sharing on the Internet-connected computer. You can skip this step if you don't need to access the Web.
2.
3.

How to enable Internet Connection Sharing
On networks with wireless routers, the router has the important job of forwarding communications from the computers on your home network to the Internet. On ad hoc networks, you must designate one computer to serve this role. The computer you choose must have a wired connection to the Internet, and it should be left on whenever you want to be able to use your other computers.

Procedure to set up the first(Main) computer
To set up an ad hoc wireless network that allows computers to share an Internet connection without a router  the procedure is :-
1.
2.
Click Start, and then click Control Panel.
3.
Under Pick a category, click Network and Internet Connections.

4.
Under or pick a Control Panel icon, click Network Connections.

5.
Right-click your wireless network connection, and then click Properties.

6.
In the Wireless Network Connection Properties dialog box, click the Wireless Networks tab.

7.
On the Wireless Networks tab, under Preferred networks, click Add.

8.
In the Wireless network properties dialog box, on the Association tab, type the name of your ad hoc wireless network in Network name (SSID) box (shown in step 10). For example, you could name your wireless network MyHomeNetwork.
9.
Clear the The key is provided for me automatically check box and select the This is a computer-to-computer (ad hoc) network check box.
10.
Create a 13-digit password and type it in both the Network key and Confirm network key boxes. For the best security, include letters, numbers, and punctuation. Then click OK.

11.
Click OK again to save your changes.


How to set up additional computers
If the computer you want to add to your network does not have built-in wireless network support, install a wireless network adapter.
Windows XP automatically detects the new adapter and notifies you that it found a wireless network.

Now connect your computer to your wireless network
Note: These steps apply only if you're using Windows XP Service Pack 2 (SP2). If you haven't installed SP2, visit Microsoft Update to install it before connecting to the ad hoc network.

1.
Right-click the Wireless Network icon in the lower right corner of your screen, and then click View Available Wireless Networks.

2.
The Wireless Network Connection window appears and displays your wireless network listed with the SSID you chose. If you don't see your network, click Refresh Network List in the upper left corner. Click your network, and then click Connect in the lower right corner.

3.
Windows XP prompts you to enter a key. Type your encryption key in both the Network key and Confirm network key boxes, and then click Connect.


Windows XP shows its progress as it connects to your network. After you're connected, you can close the Wireless Network Connection window.
Repeat these three steps on each computer that you want to connect to your ad hoc wireless network.
Now you're ready to browse the Web wirelessly, from any computer you add to your home network.